


Google Cloud Compute 上にインスタンスを構築すると、そのインスタンスのディスクは初期値で10GBになっています。ここでは、ローカル(ルート)のディスク容量を増量するの方法を調査及び研究し、その成果をまとめています。
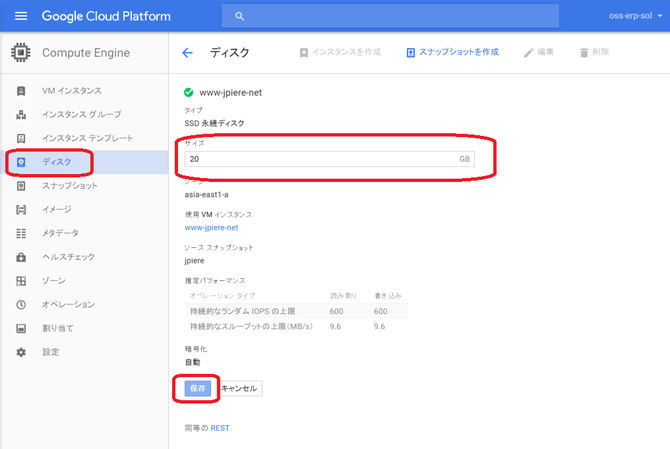
ディスクを増量する
これで、インスタンスを再起動すると、OSによっては自動でディスクを増量してくれるようです。下記リンク先参照
※Creating Customized Root Disks#Checking if your operating system supports automatic resizing
私の場合は、CentOS7を使用していましたが、自動でディスクを増量してくれませんのでしたので、手動で次の設定を行いました。
手動でディスクを増量する
まずdfコマンドを使用して、現在のディスクサイズを確認します。
$ df -h
Filesystem Size Used Avail Use% Mounted on
/dev/sda1 10G 3.1G 7.0G 31% /
devtmpfs 1.9G 0 1.9G 0% /dev
tmpfs 1.9G 4.0K 1.9G 1% /dev/shm
tmpfs 1.9G 8.2M 1.8G 1% /run
tmpfs 1.9G 0 1.9G 0% /sys/fs/cgroup
インスタンスの設定上は、20GBにしていても、CentOS7的には、10GBしか認識していない事が確認できます。
fdiskコマンド(sudo fdisk /dev/sda)を実行します。そしてコマンドに"p"を入力します。
$sudo fdisk /dev/sda
The device presents a logical sector size that is smaller than
the physical sector size. Aligning to a physical sector (or optimal
I/O) size boundary is recommended, or performance may be impacted.
Welcome to fdisk (util-linux 2.23.2).
Changes will remain in memory only, until you decide to write them.
Be careful before using the write command.
Command (m for help):p
コマンドに"p"を入力すると下記の情報が表示されます。
Disk /dev/sda: 21.5 GB, 21474836480 bytes, 41943040 sectors
Units = sectors of 1 * 512 = 512 bytes
Sector size (logical/physical): 512 bytes / 4096 bytes
I/O size (minimum/optimal): 4096 bytes / 4096 bytes
Disk label type: dos
Disk identifier: 0x0008e2ad
Device Boot Start End Blocks Id System
/dev/sda1 2048 20969472 10483712+ 83 Linux
/dev/sda/に21.5GB割り当たっている事が確認できます。次の設定のために、デバイスID(上記の例だと83)と、スタートセクターの値(上記の例だと2048)をメモしておきます。
次にコマンド"d"で/dev/sda1の論理パーティションを削除します。
Command (m for help): d
Selected partition 1
partition 1 is deleted
これでパーティションをリサイズできるようになります。この状態でpのコマンドを実行すると、もともとあったパーティションが削除されて、何も情報が表示されません。
Command (m for help): p
Disk /dev/sda: 21.5 GB, 21474836480 bytes, 41943040 sectors
Units = sectors of 1 * 512 = 512 bytes
Sector size (logical/physical): 512 bytes / 4096 bytes
I/O size (minimum/optimal): 4096 bytes / 4096 bytes
Disk label type: dos
Disk identifier: 0x0008e2ad
Device Boot Start End Blocks Id System
次にコマンド"n"を指定して、表示されるパーティションタイプに"p"を選択します。そしてパーティションナンバーを"1"に、First SectorとLast secotrの値はdefault値に合わせて設定します。
command (m for help): n
Partition type:
p primary (0 primary, 0 extended, 4 free)
e extended
Select (default p): p
Partition number (1-4, default 1): 1
First sector (2048-41943039, default 2048): 2048
Last sector, +sectors or +size{K,M,G} (2048-41943039, default 41943039): 4193039
Partition 1 of type Linux and of size 2 GiB is set
最後にコマンド"w"で保存します。
Command (m for help): w
The partition table has been altered!
Calling ioctl() to re-read partition table.
WARNING: Re-reading the partition table failed with error 16: Device or resource busy.
The kernel still uses the old table. The new table will be used at
the next reboot or after you run partprobe(8) or kpartx(8)
Syncing disks.
リブートします。
$sudo reboot
リブートしても、まだdfコマンドでは、10GBしか認識されていません。次に"sudo parted /dev/sda 'print'" コマンドで、ファイルシステムを確認します。
$ sudo parted /dev/sda 'print'
Model: Google PersistentDisk (scsi)
Disk /dev/sda: 21.5GB
Sector size (logical/physical): 512B/4096B
Partition Table: msdos
Disk Flags:
Number Start End Size Type File system Flags
1 1049kB 21.5GB 21.5GB primary xfs
ファイルシステムが"xfs"の場合は、"sudo xfs_growfs /" コマンドを実行します。これで、20GB使用できるようになります。
$ sudo xfs_growfs /
meta-data=/dev/sda1 isize=256 agcount=4, agsize=655232 blks
= sectsz=512 attr=2, projid32bit=1
= crc=0 finobt=0
data = bsize=4096 blocks=2620928, imaxpct=25
= sunit=0 swidth=0 blks
naming =version 2 bsize=4096 ascii-ci=0 ftype=0
log =internal bsize=4096 blocks=2560, version=2
= sectsz=512 sunit=0 blks, lazy-count=1
realtime =none extsz=4096 blocks=0, rtextents=0
data blocks changed from 2620928 to 5242624
ファイルシステムが"ext4,"の場合は、"resize2fs"コマンドを実行します。私は試していませんが、Googleのドキュメントでは次のコマンドが紹介されています。
$ sudo resize2fs /dev/sda1
再度にdfコマンドで確認します。
$ df -h
Filesystem Size Used Avail Use% Mounted on
/dev/sda1 20G 3.1G 17G 16% /
devtmpfs 1.9G 0 1.9G 0% /dev
tmpfs 1.9G 4.0K 1.9G 1% /dev/shm
tmpfs 1.9G 8.2M 1.8G 1% /run
tmpfs 1.9G 0 1.9G 0% /sys/fs/cgroup